RC Electric Airplanes: Complete Guide to Getting Started (and Building Real Skills)
RC electric airplanes are one of the most rewarding hobbies you can get into. Few things compare to the feeling of building (or assembling) an aircraft, setting it up correctly, and watching it lift off under your control.
That said: RC electric flight has a learning curve. There are new terms, new skills, and real consequences when mistakes happen (crashes, broken props, fried components). The good news is you can dramatically increase your odds of success by following a proven learning sequence and understanding the basics of how electric systems work.
This guide is designed to be a single “pillar” resource you can come back to as you progress—from your first simulator session to selecting batteries, motors, ESCs, props, and even float setup theory.
Table of Contents
- Getting Started with RC Electric Airplanes
- RC Flight Simulators: What They Do (and Don’t)
- A Proven Learning Sequence for Beginners
- Trainer Planes and First-Aircraft Recommendations
- Golden Rule: “2–3 Mistakes High”
- RTF vs ARF vs Kits (What to Choose)
- Electric Airframe Types and What They’re For
- LiPo Cell Count Guide (2S–10S)
- Electric Motor Terms: Kv, Current, Size
- Inrunner vs Outrunner Motors
- Motor Selection Ranges (Kv Charts)
- What Is an ESC (and How to Size It)
- BEC Notes for 5S+ and High-Voltage Setups
- Propellers: Balancing, Selection, 2-Blade vs 3/4-Blade
- Float Plane Design Theory (RC Seaplanes)
- Mounting Floats, Water Rudders, and Prop Choice
- Float Design Calculations (What to Measure)
Getting Started with RC Electric Airplanes
Before you buy your first airplane, do yourself a favor and connect with a local RC club or experienced pilot if you can. Even one session with a competent instructor can save you weeks of frustration and the cost of repairs.
Why a club/instructor matters
- They’ll help you choose a beginner-friendly airframe
- They can inspect setup issues (CG, control direction, throws)
- They’ll teach safe habits (range checks, flight line rules)
- Most importantly: they can “save” the aircraft during training
Even if you already bought a plane, getting help before the first flight can make the difference between a smooth learning experience and repeated crashes.
RC Flight Simulators: What They Do (and Don’t)
RC flight simulators have come a long way since early versions in the 1980s. Modern sims can feel surprisingly realistic, with better physics, better visuals, and huge model libraries (planes, gliders, helicopters, even drones).
Why simulators are great
For beginners, simulators build:
- orientation skills (especially when the plane is coming toward you)
- muscle memory (correcting bank, pitch, and yaw without thinking)
- recovery ability (saving a bad approach, correcting a stall)
For experienced pilots, they’re still valuable for practicing risky maneuvers without risking real damage.
How RC simulators work (modern version)
Most simulator software is now:
- downloadable (sometimes still on media)
- used with a USB controller, gamepad, or (best option) a real transmitter via interface
Best practice: use a simulator setup that lets you train with a real transmitter. It’s the closest way to build real control habits.
Key differences vs real life
Even great sims can’t perfectly replicate:
- unpredictable gusts and turbulence
- depth perception and real visibility
- stress/pressure of a real flight
- small setup issues that matter (CG, trim, vibration)
Use a sim to accelerate learning—but still plan to train in the field.
A Proven Learning Sequence for Beginners
Step 1: Sim first (seriously)
Your first goal in a sim is simple:
Recover the airplane from any position without hesitation.
If you have to “think” about which way to move the sticks when the plane is angled, your reaction time will be too slow in real life. The target is automatic correction (muscle memory).
Step 2: Move to a real trainer + instructor
When you can consistently:
- take off
- fly circuits
- recover from awkward attitudes
- land without panic
…then you’re ready to train on a real electric aircraft, ideally with instructor support.
Trainer Planes and First-Aircraft Recommendations
A beginner’s airplane should prioritize:
- stability over speed
- durability over looks
- visibility over small size
Foam trainers are popular because they can be repaired easily, and their flight characteristics are forgiving.
If you’re shopping, look for:
- high-wing design (more stability)
- moderate wingspan (easier to see)
- gentle stall behavior
- parts availability
You’ll also need (depending on the plane version):
- LiPo battery
- charger
- radio system (transmitter + receiver)
Golden Rule: “2–3 Mistakes High”
When learning with an instructor, the best advice is still:
Fly 2–3 mistakes high.
That means high enough that if you make a mistake (or two), there’s still time to recover or for the instructor to take control.
Yes, it can feel uncomfortably high at first. But altitude buys time—and time buys successful learning.
RTF vs ARF vs Kits (What to Choose)
RTF (Ready to Fly)
RTF airplanes are the quickest path to flying:
- mostly assembled
- typically include most electronics
- designed to reduce setup errors
Important: “ready to fly” does not mean “safe to fly without checking.” Have an experienced pilot verify:
- control directions
- throws and rates
- CG (center of gravity)
- prop tightness and motor direction
ARF (Almost Ready to Fly)
ARF planes are partially assembled but require you to choose/install:
- motor
- ESC
- battery
- receiver
- sometimes servos
ARF gives you flexibility and often higher performance, but demands more knowledge.
Kits
Kits provide maximum control over the build and component choices—but they’re typically best after you understand the basics.
Electric Airframe Types and What They’re For
Gliders / Sailplanes
Gliders are designed for efficiency and long flight times:
- long wingspans
- light wing loading
- can use folding props, tow launch, winch, or thermals
Slow Flyers / Park Flyers
Small, light aircraft meant for calmer conditions:
- typically 22″–38″ wingspans
- light weight (often 8–18 oz)
- best in low wind
Trainers
Designed specifically for learning:
- high wing
- stable controls
- predictable stall behavior
- usually ~50″ wingspan (varies)
Sport Planes / Warbirds
A step up from trainers:
- faster
- more responsive
- often mid/low wing
Warbirds are sport planes modeled after full-scale WWII aircraft.
Aerobatic / 3D
Extreme performance aircraft:
- thrust-to-weight often > 1:1
- large control surfaces
- capable of hovering (“hanging on the prop”)
Best for advanced pilots.
Racers
Minimum drag, maximum speed:
- commonly 100+ mph
- sometimes 200+ mph
- very demanding on pilot skill and setup precision
LiPo Cell Count Guide (2S–10S)
Choosing the right battery is a balance of:
- voltage (cell count)
- capacity (mAh)
- discharge rating (C rating)
- weight
Most RC planes use 3S–10S LiPo packs, with typical capacities between 1800–3500 mAh (varies widely by size/class).
Below are starting-point guidelines.
Slower flight speeds (trainers, general sport)
| Airframe size (wingspan) | Cell count |
|---|---|
| 30–39″ | 2S |
| 38–56″ | 3S |
| 50–70″ | 4S |
| 70–90″ | 5S / 6S |
| 90–105″ | 7S / 8S |
| 105″+ | 9S / 10S |
Higher flight speeds (sport / aerobatic)
| Airframe size (wingspan) | Cell count |
|---|---|
| 20–30″ | 2S / 3S |
| 30–40″ | 3S |
| 40–50″ | 4S |
| 50–65″ | 5S / 6S |
| 65–80″ | 7S / 8S |
| 80″+ | 9S / 10S |
These are guidelines, not rules. Many setups fall slightly outside these ranges depending on the airframe, weight, and target performance.
Electric Motor Terms: Kv, Current, Size
Kv (RPM per volt)
Kv tells you how many RPM a motor will spin per volt (no-load).
- Higher Kv: typically used on lower cell counts (higher RPM)
- Lower Kv: typically used on higher cell counts (more torque, lower RPM)
Kv depends on motor design, size, and winding.
Max continuous current
This is the maximum sustained current (amps) the motor can safely handle. Peak current may be higher, but continuous is what matters for avoiding overheating.
Physical size
In general, larger motors produce more power. Motor size (can diameter/length) often scales with the wattage it can handle.
To choose a motor intelligently, you need:
- airframe type (trainer vs sport vs 3D)
- wingspan/weight
- intended cell count
Inrunner vs Outrunner Motors
Inrunner motors
- higher Kv for their size
- often used for higher-speed applications
- rotor spins inside the stationary stator
Outrunner motors
- lower Kv, higher torque
- common in most electric airplanes
- outer can spins around the windings
Motor Selection Ranges (Kv Charts)
These Kv ranges are practical starting points. They won’t cover every edge case, but they’re a strong baseline.
Slower flight speeds (trainers / slow fly)
| Cell Count | Kv Range |
|---|---|
| 2S | 1200–2400 Kv |
| 3S | 800–1600 Kv |
| 4S | 600–1250 Kv |
| 5S | 500–1000 Kv |
| 6S | 400–850 Kv |
| 7S | 350–700 Kv |
| 8S | 300–600 Kv |
| 9S | 270–550 Kv |
| 10S | 240–480 Kv |
| 12S | 200–400 Kv |
Higher flight speeds (sport / aerobatic)
| Cell Count | Kv Range |
|---|---|
| 2S | 2400–4500 Kv |
| 3S | 1600–3000 Kv |
| 4S | 1200–2220 Kv |
| 5S | 970–1850 Kv |
| 6S | 800–1500 Kv |
| 7S | 700–1280 Kv |
| 8S | 600–1120 Kv |
| 9S | 530–1000 Kv |
| 10S | 480–900 Kv |
| 12S | 400–750 Kv |
Again: these charts accommodate most setups, but it’s normal to see builds that fall outside the range for specific performance goals.
What Is an ESC (and How to Size It)
An ESC (Electronic Speed Controller) regulates power from the battery to the motor. ESC selection is critical: undersize it and you risk overheating or failure.
ESC sizing basics
- Choose an ESC rated above your expected continuous current draw.
- Ensure the ESC supports your cell count (voltage).
- Buy quality—cheap ESCs fail more often and can cost you more in the long run.
Your ESC label should clearly show:
- maximum continuous current (e.g., 50A)
- max cell count (e.g., 6S)
Timing and cutoff notes
- Follow motor manufacturer timing recommendations. If unsure, start low.
- Low-voltage cutoff is often set around 3.0V per cell, but many pilots set it higher (e.g., 3.2V per cell) depending on the setup and how conservatively they want to land.
Propellers: Balancing, Selection, 2-Blade vs 3/4-Blade
Prop balancing
Most props are not perfectly balanced out of the package. An unbalanced prop can cause:
- vibration
- reduced efficiency
- premature bearing wear
- loosened hardware
- poor flight performance
A magnetic prop balancer is the most common tool.
Balancing method (safe + practical):
- Mount the prop on the balancer
- The heavy blade drops downward
- Remove material from the appropriate face of the heavy blade (small amounts!)
- Recheck frequently until it stays level
Prop selection (diameter and pitch)
Prop choice is one of the hardest parts of electric flight because every combination is different.
Core rule:
- larger diameter / higher pitch = more load = more current draw
- smaller diameter / lower pitch = less load = less current
Important: It’s not “voltage” that usually kills motors/ESCs—it’s excess current draw and overheating.
If you’re unsure, start conservative and verify current draw with a wattmeter.
2-blade vs 3/4-blade (same diameter/pitch)
2-blade:
- generally higher top speed
- lower load
- higher RPM
3/4-blade:
- more thrust / acceleration
- more scale appearance
- typically higher load
Float Plane Design Theory (RC Seaplanes)
Adding floats can massively expand where and how you fly. Water takeoffs and landings do require practice, and float geometry matters more than many people realize.
Float mount angle vs wing chord line
A typical starting point:
- floats mounted 2–3° negative relative to the wing chord line
This helps lift and “get on step” during takeoff.
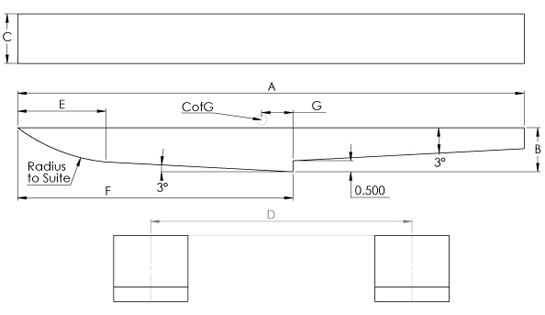
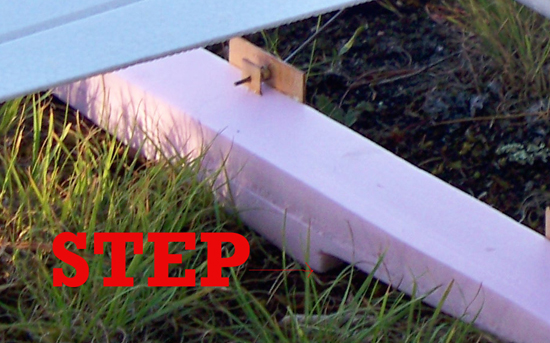
The float step
The step is the break in the bottom surface of the float. It reduces drag and helps the aircraft rotate during takeoff.
Step location rule:
- step should be slightly behind the airplane’s center of gravity
Never forward of CG.
Typical float bottom geometry:
- from step forward: ~3° upward slope until the curved nose
- from step aft: often another ~3° slope to the rear
Mounting Floats, Water Rudders, and Prop Choice
Props and thrust (seaplane reality)
Floatplanes need strong pulling power to break free of the water.
It’s common to:
- increase prop diameter by one size for thrust
- decrease pitch by one size to reduce load if needed
Safety note: avoid wooden props for water flying. Water ingestion can weaken them and they can fail dangerously.
Water rudders
Water rudders make taxiing realistic and controllable.
- One is good
- Two (one per float) can be excellent depending on design
- a water rudder that comes right off of the rudder tail, works very well!
Mounting floats
A common approach is adapting parts of a tricycle gear assembly (like the nose gear mount) to create a strong, adjustable front float mount.
A good baseline:
- rear float mount roughly ½ chord width behind the main wing trailing edge (varies by airframe)
Float Design Calculations (What to Measure)
If you’re using a float calculator or design guide, the inputs typically include:
- wingspan (tip to tip)
- prop to elevator hinge line distance
- prop to CG distance (measured on the main wing)
These measurements help determine float length, step location, and mount positions so the aircraft sits correctly on the water and rotates properly during takeoff.
Visit the float design calculator page to learn more details about float design.